|
|
|
Let's set some ground rules first: this site isn't the best place
for deciding what camera to buy. As far as I'm concerned, your
choice is limited to only two -- the Canon Digital Rebel or the Nikon 995, depending upon your budget and
needs. If you want reviews and/or unbiased opinions (yeah,
right) I'd advise you to visit the excellent www.dpreview.com
|
|
Getting Started
Here are some myths about digital, along with the truth:
What Digital Won't Do For
You
1. It's faster to shoot and make prints with digital.
False. You can shoot a roll of film in your film camera,
take it to a one-hour processing place, and have prints in your hand
(even double prints) in about the same time as you can get back to
your house and download all your images from your digital camera.
Even with a fast printer and doing zero post-processing on your
images you'll be hard pressed to get a set of prints in your hand in
twice that time. More often it will be much longer, perhaps
days, before you're done working over your images and making them
the best they can be. Even then, it's hardly likely you'll be
printing out dozens of 4x6 images (for one thing even with roll
paper it just isn't all that convenient to print smaller sizes --
using letter paper is far easier).
So digital isn't the Polaroid of the 21st century. If
making lots of prints to distribute to your friends is your idea of
what photography is all about, then digital may not be for you.
2. It's cheaper to shoot with digital than with film. Mostly
false. You can buy a very nice film SLR for less than
$500. The lenses are the same cost, so all you really need is
the film.
For digital you'll need to spend about four times that amount for
a comparable digital SLR. Then you need a computer, a printer,
and all the software to make it go (see below). If you don't
have all these things you can easily spend 3K or more. Finally
you'll need some digital storage, which will run about the cost of
that film camera.
Now, once you have all this you've spent about 5K more than you
would have spent going with film. $5,000 will buy an awful lot
of film and film processing. And you'll also be spending money
on paper and ink for your printer, for those images you do decide to
print.
What Digital Will Do For
You
1. Film produces better images. False. See
discussion on Luminous-Landscape
for full details. Basically, the bottom line is this: if
you don't need a print larger than 8x10, digital can be every bit as
good if not better than 35mm film. This depends on the camera
as well as the printer. Even producing Super B prints
(13x19") a quality digital (like the D30) can hold its own.
Beyond that size film does win, and film also wins when you have
to crop your images more than a little bit. But the ability to
post process your images makes you the finest photofinisher in the
world.
2. You can be just as good a photographer with a film camera
as a digital camera. Mostly false. The best
photographers in the world take hundreds of thousands of frames of
film. Typically they'll shoot 20 or 30 rolls of film in a days
shoot. They may shoot a lot of images that aren't so good, but
they can afford to toss away 200 images for every one they keep
(while wildlife is among the most difficult subjects in the world,
it's worth noting the ratio of discards to keepers at the National
Geographic is 6000 to 1).
Unless an amateur is willing to spend thousands of dollars on
film each year, he can't possibly compete with the pros. Now,
here is where it becomes cheaper to shoot with digital -- if you
don't print all you shoot, you have zero costs when it comes to
taking images (if you're using rechargeable batteries -- there is
some very very tiny electric cost involved, but too small to
track). You, too, can shoot thousands of images a year in
order to get that one or two that are truly great.
There's a bigger issue here, however, and it's the true reason to
go digital if you're serious about photography. There's no
question that practice makes perfect, and it's equally without doubt
that feedback is one of the most powerful mechanisms there is in
order to improve whatever you do. Imagine trying to learn to
play a musical instrument if you couldn't hear it until after it was
recorded and played back.
With film cameras the quickest you can get feedback is much
slower than that -- even an hour later is much too late to truly
learn. With digital you get near instant feedback, and this
makes all the difference in the world.
I learned more about photography in the first week with a digital
camera than I learned in forty years of taking film. This is
very, very important to understand.
3. You can scan film just as easily and quickly as shooting
digital. False. This is the flip side of producing
prints quickly. If your goal is to get a digital image,
whether it's to share it via the web or to work on it for your own
custom photo processing, nothing beats the speed of a digital
camera. You won't have even scanned one print or slide in the
time it will take to download a few hundred from your camera.
Scanning is a big PITA, and the best slide scanners in the world
can't compete with a quality digital SLR like the D30.
|
|
The Camera
Up until as recent as a year ago, digital cameras were in no way a
match for film. They were great for web shots, and neat little
toys, but the resolution was not enough to do much more than a 2x3
inch print.
That all changed with the introduction of the 3.3mp
cameras. MP refers to megapixels, or millions of pixels, and
3.3 is a magic number. It's the number which allows you to
produce an 8x10" printout, which is the size that starts making
your images look interesting. Depending upon the camera and
tools you use you can print up to Super B size (13x19") with
such an image. Now we're talking!
The downside is cost -- be prepared to spend a minimum of about
$800 for a good 3.3mp camera, such as the Nikon 995 or Canon
G1. This will buy you a very good point and shoot camera, one
in which the fixed lens goes from a rather wide angle to a decent
telephoto. It will do macro for close-ups, and will have
various exposure modes, such as action and landscape photography,
that take a lot of the thinking out of the image taking process (but
are no substitute for understanding about photography!)
What it won't buy you is a true SLR -- interchangeable lenses,
the ability to shoot without looking at an LCD (which is often hard
to see in many lighting conditions), quick focusing, fast,
continuous shooting and, above all, a image capture area large
enough to avoid some problems.
This last is hard to explain: if two cameras capture the same
amount of pixels, how come the quality isn't the same? That's
due in large part to the size of the device that's capturing
them. You can read about the details at the site noted
above. Just be aware that the SLR digital cameras are much
better at making images.
So what's one of these puppies going to run you? Right now,
around 2K, but they're cheap at twice the price. (However,
remember you'll also have to buy lenses unless you have some
existing ones you can use). Up until last year you would have
paid two to ten times as much. Are prices going to drop?
Of course, but deciding when to buy a digital camera is like
deciding when to buy a computer. Prices always drop, the
machines always get better, and if you continue to wait you'll never
have one. You do the math.
You may hear nowadays of cameras boasting higher resolutions,
some much higher. Nikon just announced a 5mp camera.
There are 6 and 7mp cameras on the horizon. So is a 3.3mp
camera enough?
Remember more pixels is a two-edged sword. You want enough,
but having more isn't always better. For one thing, storage
requirements will dramatically increase. Speed of processing,
both during and after shooting, will go down. And more pixels
doesn't necessarily mean a better picture (see discussion above
about quality).
The bottom line is you need at least 3.3mp for quality
images. For details on how good the images are, see the dpreview site.
|
|
|
|
The Computer
Ah, yes, you do need one of these to do digital
photography. Of course if you are reading this you have access
to a computer, but if you're at work (naughty, naughty!) you might
not have one at home. Get one. You'll need/want
one. The faster the better, the more memory the better, but a
good starter machine will be around 500mz (or more), with 128mb
memory (or more) and a 17" monitor (or larger).
This isn't too expensive right now -- you ought to be able to get
this all together for around 1K... but that isn't all you
need. You'll also need software.
|
|
|
|
The Software
The two basic pieces of software you'll need are some sort of photo
editing program, and some sort of cataloging program. A lot of
machines will come with some minimum photo program, but it's usually
pretty crappy. If you're serious about your imaging you'll
want Adobe's Photoshop. The full version, not the "lite"
or "LE" version. Yes, it's expensive and like the
hair color ad, worth every penny. It truly is the other half
of your camera, so don't scrimp (right now PS 6 is going for around
$600).
Luckily the other program you need is much cheaper. You
need a thumbnail, or cataloging program to keep track of all the
thousands of images you'll be creating. I recommend ThumbsPlus, but a lot of people
swear by ACDsee.
They have trial versions so you can see which one (if either) you
like.
|
|
Hardware
You didn't think we were done with the computer yet, did you?
Well, you really will need a CDR, which is a piece of hardware you
can use to create your own CDs. But we're not talking music,
here (although you can create music CDs with them).
With each image taking up to 3mb, you'll quickly fill up your
hard drive no matter how large. So you get a CDR and archive
your images to CDs (which your thumbnail program will
catalog). CDRs have come down quite a bit in price recently --
you ought to be able to get one for around $200.
|
|
|
|
The Printer
Yep, it's also hardware, but it really deserves a heading all its
own. Once again the congruence of technology streams have come
together at the right time. Ink Jet printers, once the poor
children of the output set, barely able to produce 6 dithered
colors, jamming up constantly, and running through cartridges like
there was no tomorrow, have finally matured. Now they produce
truly photographic quality output of millions of apparent colors,
seldom jam, and... well, they still run through cartridges like
there's no tomorrow. Some things never change.
Right now it's hard to beat the Epson 880/1280 (in Europe,
890/1290) series for true photo quality output. I've been a
big fan of HP for a long time, and still like the fact that when you
change ink you also change the print head, but Epson has jumped
ahead and HP hasn't caught up yet. So far the reviews are all
pretty unanimous, and for less then $200 (for the 880) it's hard to
imagine a better way to go.
|
| |
|
|
|
|
The Beginner's Guide to Portrait Photography
I've gotten a lot of requests to document how the portrait images
were taken (see Friends and Family).
Now, I don't pretend to be an expert at studio photography -- far
from it. Most of what I know I learned through
experimentation. Also, if you want a studio perspective I'd
recommend visiting the excellent lighting site, www.lightingmagic.com.
However, you can do a lot of great portraits without a huge
investment in either equipment or knowledge. Here's the basics
of what I do (written from the perspective of using the Canon D30
and it's associated equipment -- you can do the same with film
and/or other digital cameras, by substituting the appropriate flash
units):
Equipment to make the process dead solid simple
is one of the keys. I use two Canon flash units, one 550 EX
and one 420 EX. You can use two of the same units, either the
420 (to save money) or two 550's if you've got the bucks. You
also get an E2 to control both of the flashes. This unit stays
on the camera and is triggered by the shutter, firing the other
flashes. (Note: you can also use a 550EX for a trigger but
since you will have to turn it off it's kind of a waste of
money). This way you have the camera doing ETTL and taking all
(or most) of the guesswork out of exposure (even though you have a
digital camera and can adjust things as you shoot, it's nice to have
an easy starting point). This will give you wireless control
of all your flash units -- if you're using a camera other than a
Canon EOS system you'll probably have to use wired flashes and/or
use slave triggers.
You must get your flash off camera. The biggest
mistake beginners make is thinking they can take nice flash pictures
with either the built-in flash or an external flash mounted on the
camera. Wrong! Your images will look like mug shots and
the shadows will be all wrong. You'll be amazed how wonderful
your images start looking when you move that flash off the camera.
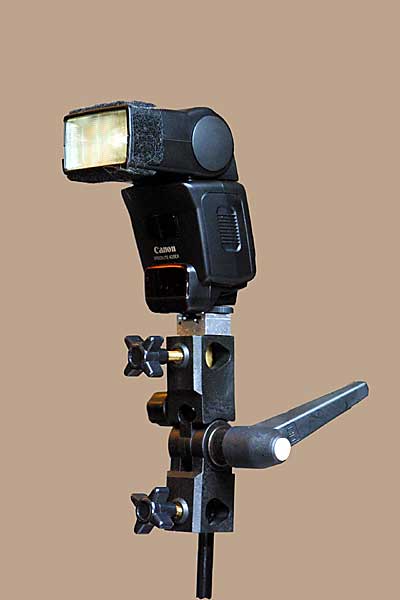
To get the flash off
camera, you'll need some stands for the flash. Smith-Victor
has been making lighting stands for decades, and they still sell the
ones I use, the venerable S3 (around $30) . You'll also need
some hot shoe adapter to fit onto the light stand (and to hold the
umbrellas): Photoflex has a really nice Shoe mount Multi-clamp that
goes for $17 or so.
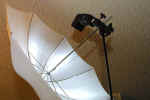
Umbrellas -- they're not just for rain. These are the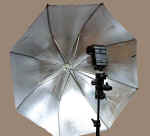 devices that soften the light to give that wonderful
Northern light sort of look. There are lots of models out
there but I like the Photoflex ones. I have four of them: the
45" white satin ($16), the 45" convertible ($30), the
30" white satin ($17) and the 30" convertible ($24).
(I just don't have the studio space for the 60" models). devices that soften the light to give that wonderful
Northern light sort of look. There are lots of models out
there but I like the Photoflex ones. I have four of them: the
45" white satin ($16), the 45" convertible ($30), the
30" white satin ($17) and the 30" convertible ($24).
(I just don't have the studio space for the 60" models).
You place your key light (your main light) off to one side of the
other. The key can be either shot through the umbrella (for a
really diffused look), bounced off the umbrella (less diffused) or
without an umbrella (very harsh for dramatic portraits).
You put your fill light directly behind your camera, above
you. Normally the fill is just bounced off the umbrella.
For a background I use black material placed about four to five
feet behind. It isn't critical as to color, since it shouldn't
receive much light (in our case all the portraits were shot in our
TV room and the black material was just draped over our big screen
TV). Doing high key portraits (with a white background) will
require either another background flash or to work very close to the
background so your key light will fall there as well (I have a third
420EX for this purpose).
Your model puts her face towards the key light but turns her eyes
back to the camera. Turn the D30 on to manual. Adjust
your flash EV to around +1 to +1 1/2. Now shoot. Adjust
your fill light (using the E2 for slave/master ratio) as
desired. You can even shoot without fill (some of the
portraits on this site were done without fill). Adjust your
flash EV if the exposure is too hot or too dark (but it should be
nearly right on).
|
|
That's all there is to it (but for full details, see below). The lighting stands and
umbrellas will cost you less than $150. Your biggest expense
will be the flash units and the E2. If you already have one
flash unit you can pick up a 420 and E2 for around $400. It's
all wireless and automatic exposure so there's no easier way to go.
|
|
|
|
You Can Take it with You
|
|
If you were never going to move this stuff anywhere you'd probably
be better off buying studio lights. The cost will be
approximately the same and they will flash longer and cheaper.
But having a wireless system like the EOS one is terrific because
you can eat your cake and have it, too. You can setup a very
nice studio system that you can then pack up and take nearly
anywhere, even outside (although with any kind of wind outside
you'll probably need heavier stands, with the capability of putting
sandbags or other weights on them. Even then, umbrellas
outside aren't much fun when the weather is bad).

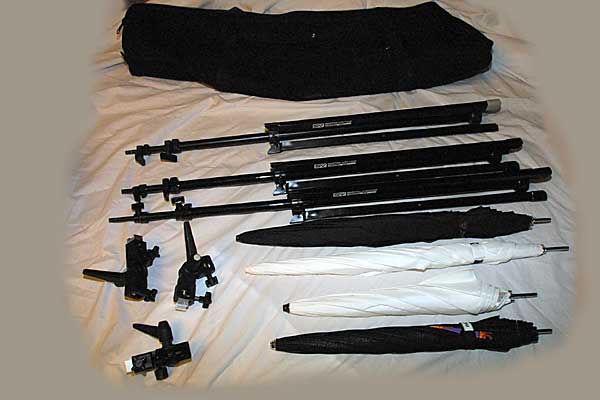
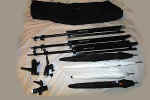
I'd recommend getting a nice bag to carry all this stuff -- I use
a Domke F-400 original sling bag ($48) which is long enough to carry
the Smith-Victor stands, and small enough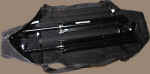 for even an old guy like me to handle. My
three stands, four umbrellas and three mounts all fit easily
inside. The bag is nicely constructed, with heavy duty zippers
and accessory pockets. for even an old guy like me to handle. My
three stands, four umbrellas and three mounts all fit easily
inside. The bag is nicely constructed, with heavy duty zippers
and accessory pockets.
I put my three flashes in a small padded camera bag I had laying
around (I didn't want to put them in the Domke although they would
have fit), so it's just the two bags that carry my entire lighting
studio. The only other thing you need is batteries -- lots and
lots if you're going on a remote shoot (the ni-cad rechargables will
be much cheaper in the long run, but be aware that normal alkaline
batteries will give you about three times as many flashes.
Either carry a lot of ni-cads or be prepared to go through a lot of
alkalines. TANSTAAFL). |
|
|
|
|
|
Portrait Lighting
|
|
Basic lighting setups haven't changed for over 100 years (or since
we could have indoor lighting for photography). The nice thing
about digital is that you can experiment to your hearts content,
seeing the results immediately, but the first thing you'll learn
eventually are these standard lighting concepts:
You need a key, or main light, which is just what it
sounds. It provides the primary light source for your image,
and should be the only one which shows definite shadows (if you have
more than one shadow source in your image it will look confusing and
amateurish).
You usually need a fill light, which simply reduces the contrast
between the main light and the shadow areas of your image.
This light is never brighter than your key (or it would be
the key) and is usually not as bright (or you would have flat
light).
You may or may not have a hair or accent light. This light,
aimed from the back, lights the back of the head to provide
separation of the head from the background. It's pretty trite
nowadays to have such a light, but it has become a cliché because
it's effective.
You may or may not have a background light, which lights the
background (duh). You'll need this if your background needs to
be lit (you don't want a dark or black background) and your key and
fill lights do not provide enough light (they usually won't).
So at the very most you'll need four light sources, but usually
you can work just fine with two or three (and sometimes you can get
by with one). Also note that reflectors and/or natural sources
(like the light from a window) can substitute for one or more of
these lights. So if you only have one flash you can still
produce nice portraits (it just requires a little more effort).
How
they work
Let's see these lights in action. First we'll discuss how
to place our key, or main light. Usually you'll want to
position this high, high enough that the shadow cast by the nose
comes down to just touch the upper lip (however, you don't need to
put it this high if room and/or your lighting stands don't permit
it).
The next issue is where, to the side, you want to put the
light. There are three distinct places -- directly in front of
the model, to the short side and to the long side of her face.
 Placing the light directly in
front of the model gives you much the same kind of lighting you
would get if the flash were mounted on the camera. The only
difference is the light is a lot higher, so we see shadows coming
down, but the light itself is pretty harsh and unattractive to the
face. We'll discuss how we can use this light later on. Placing the light directly in
front of the model gives you much the same kind of lighting you
would get if the flash were mounted on the camera. The only
difference is the light is a lot higher, so we see shadows coming
down, but the light itself is pretty harsh and unattractive to the
face. We'll discuss how we can use this light later on.
 Placing the light so that it
illuminates the broad side of the model's face is even worse in most
cases. It's the usual mistake a beginner makes in portrait
photography. The problem is that with the light on this side
of the face it makes the model's face look wider, which is not
usually what you want to do. Unless your model is Calista
Flockhart it's not recommended to use broad lighting. Placing the light so that it
illuminates the broad side of the model's face is even worse in most
cases. It's the usual mistake a beginner makes in portrait
photography. The problem is that with the light on this side
of the face it makes the model's face look wider, which is not
usually what you want to do. Unless your model is Calista
Flockhart it's not recommended to use broad lighting.

The third option is placing the light so it illuminates the short
side, or the side of the face away from the camera. This is
called, naturally enough, short lighting, and is by far the
preferred lighting of portrait photography. It makes the face
slender and is very flattering for nearly everybody. Note that
the model faces the light, turning her face slightly away from the
camera (for a real person have him or her look with their eyes at
the camera as their face is turned away).
Now that we have our key light placed, the only thing that
remains is to fill in the shadows to our liking. Traditionally
the fill is mounted behind and above the camera position. If
you are using the EOS wireless flash system you can set the ratio
between your fill and key lights quite easily. Here are two
typical ratios:
 
If you want a hair or accent light you can add one behind the
model, pointing at the top of their head. You must be careful
that this light does not shine into the camera, nor do you want it
to illuminate anything other than the hair. Studio lighting
systems use barn doors (devices which fit over the lights to limit
where they shine -- they look just like the doors on a barn) to
control just where the light will go. Done correctly the light
does add a nice touch, although some folks (like myself) feel it's a
little artificial looking. In order to see what this looks
like we need to see a subject with dark hair, as our blonde already
stands out from the background.


The only other thing that remains is to light your
background. If your subject is quite close to the background
your key and fill lights may do a good enough job. Otherwise,
a dedicated light aimed at the backdrop will fill it out nicely.
But
softly
Once you have the basic concepts down you are free to break the
rules as needed. We mentioned that light shining directly into
your model's face -- if you can diffuse the light enough you can end
up with one of the most flattering of all portrait shots. This
requires a lot of diffusion, because you want to eliminate
nearly all shadows, and you need the light to "mold"
around the model's face to keep her from looking as fat as Louie
Anderson. Shooting through a white umbrella will do the trick,
as will the various softboxes and moon lights available.
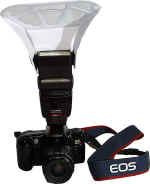
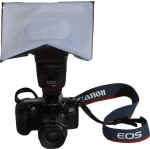
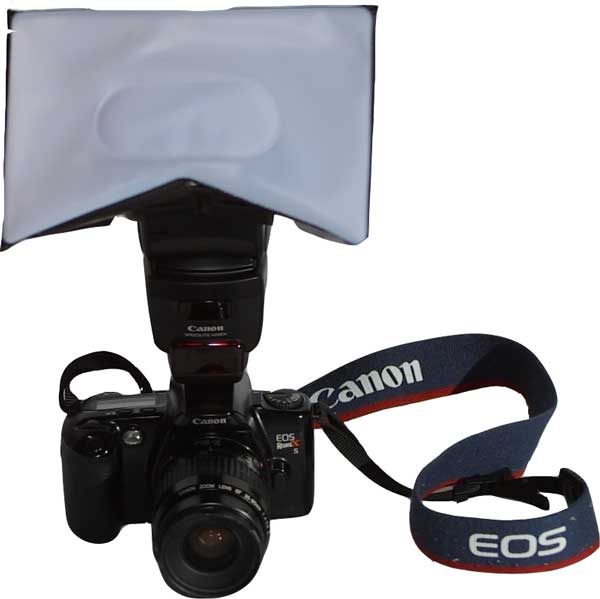
If you only have one flash and you need to keep it on camera you
can buy the devices by Lumiquest to soften your flash output.
These are the "poor man's" umbrellas, and while they will
do in a pinch they are no substitute for using umbrellas and real
soft boxes. If I have to use on-camera flash (like at a party
where I'm just doing candids and available light isn't an option) I
use these. They are also good for softening fill flash
outdoors, where the sun is your key light.
And if you are in a situation where you only have the one
umbrella and/or one light stand, if you have the 550EX you can put
it on the camera as both your fill light and your trigger for your
other flash mounted on the stand. Use the Lumiquest stuff to
soften your fill and you have a little "mini-studio"
that's easier to work in crowded rooms (used this way don't forget
to reverse your 550EX ratios so that the on-board 550 is set for lower
output than your stand mounted key light flash).
Finally there are all the wonderful things you can do with
putting various colored gels or filters on your flash units.
Lumiquest makes a gel holder, complete with gels, that allows you to
get very creative. As a rule you'll want to use these  only on your accent and/or
background lights but if you want to go wild there's no one stopping
you. If you are tempted to put gels on your key and
fill lights, remember a rule of thumb from theater is to mix both
"hot" and "cold", so that you might have a warm
gold light as your key, and a cool blue light as your fill.
Mixing colored lights like this may not prove flattering to your
models, but it might win you awards. only on your accent and/or
background lights but if you want to go wild there's no one stopping
you. If you are tempted to put gels on your key and
fill lights, remember a rule of thumb from theater is to mix both
"hot" and "cold", so that you might have a warm
gold light as your key, and a cool blue light as your fill.
Mixing colored lights like this may not prove flattering to your
models, but it might win you awards. |
|
|
|